What is the quick answer?
Learn how to take clips from YouTube videos. Explore 3 methods: native tools & AI clippers. Get a step-by-step guide to create viral Shorts, Reels, & TikToks.
Key takeaways
- The Gold Hiding in Your Long-Form Videos
- Why creators miss their own best moments
- The moment-finding bottleneck
- Method 1 The Fast Lane with YouTube's Native Tools
- Use the Clip button when speed matters
- Use Edit into a Short when you want a publishable asset
Overview
You've got a long YouTube video that took hours to make. It might be a podcast, a tutorial, a livestream, or a talking-head breakdown. It's live, it's decent, and you know there are stronger moments buried inside it than the full upload is getting credit for.
That is the central clipping problem. It usually isn't lack of content. It's friction. Finding the right moment, cutting it cleanly, formatting it for Shorts or Reels, and publishing fast enough that the idea still feels fresh can turn one good video into a chore.
Creators who figure out how to take clips from youtube videos stop thinking in single uploads. They start thinking in content inventory. One long video becomes a stack of short assets, each built for reach, retention, and shares.
The Gold Hiding in Your Long-Form Videos
Most creators know the feeling. You finish a 20-minute or 40-minute video and immediately remember three moments that would crush as Shorts. Then life happens, the edit queue grows, and those moments stay trapped in the timeline.
That's a waste, because long-form videos usually contain multiple high-traction segments. A strong analogy, a sharp opinion, a surprising lesson, a clean before-and-after explanation, or a funny reaction can all work as standalone clips if you extract them correctly. The trick isn't just cutting them out. It's cutting them with purpose.
Why creators miss their own best moments
The biggest issue is search cost. Scrubbing manually through a full interview or tutorial is slow. If the video is dense, you'll often know a good moment exists without remembering exactly where it starts. That turns clipping into the task you keep postponing.
A better way is to treat your upload like source material, not a finished product. That mindset shift changes everything. The full video builds authority. The clips bring discovery.
Practical rule: Don't ask, “What part of this video can I cut?” Ask, “What single moment would make someone stop scrolling?”
Creators who already think in repurposing systems tend to get more mileage out of every recording session. The same logic applies outside video too. If you're looking at cross-platform content planning, this guide to repurposing SEO blogs for TikTok is useful because it shows the same core principle: one strong source asset can become many distribution pieces.
The moment-finding bottleneck
Transcript-based search changes the game. Instead of dragging a playhead around and guessing, you search language, ideas, or phrases and jump straight to likely highlights. A tool like Clip Finder fits that workflow because it helps locate usable moments faster than manual scrubbing.
The creators who clip consistently don't always record more. They just waste less footage.
Method 1 The Fast Lane with YouTube's Native Tools
If you want the shortest path from video to shareable moment, start inside YouTube. Native tools won't give you the deepest creative control, but they're fast, clean, and built for low-friction repurposing.
YouTube's native Clip feature, introduced in 2021, lets users extract precise 5- to 60-second segments, and that rollout landed during a huge short-form wave as YouTube Shorts views jumped from 6 billion daily in 2020 to over 30 billion by mid-2021 according to YouTube's official reporting in this YouTube product update.
Use Edit into a Short when you want a publishable asset
If you own the video and want something closer to a finished short, use YouTube Studio's native Short repurposing workflow. This tool is better for creators who want to turn long-form segments into actual Shorts on their channel.
The basic flow is simple:
Here's a walkthrough if you want to see the native process in action:
This tool is strong because it avoids the old loop of downloading, editing elsewhere, exporting, and re-uploading. If you want another practical companion guide focused on the basics, this walkthrough on how to create YouTube video clips is a useful reference point.
For creators who outgrow the native editor and need more formatting control for Shorts, a browser-based YouTube Shorts video editor can make the next step easier.
- Grab the video URL from the long-form upload.
- Open YouTube Studio and use the short creation flow.
- Select the segment with the visual timeline editor.
- Trim frame precisely and publish directly as a Short.
Method 2 The DIY Approach with Screen Recorders
A lot of creators land here first because it feels flexible. Open the video, hit record, capture the segment, trim it, done. That's the appeal.
It's also where a lot of people create extra work for themselves.

When screen recording makes sense
This method is decent when you need a quick capture from a video you don't own, when the original file isn't available, or when you're testing ideas before investing time in a heavier workflow.
OBS Studio is the common pick because it gives you control over canvas size, audio input, and recording quality. Built-in phone or desktop recorders also work in a pinch. If you go this route, keep the setup simple:
For some commentary channels, screen recording is still a practical scratchpad. You grab the moment, test the edit, then decide if it deserves a polished version.
Screen recording is a backup method, not a scaling method.
- Record at the final framing you need: If the destination is vertical, plan for that before you capture.
- Check system audio first: A clean clip with bad audio still feels broken.
- Close background apps: Notifications and lag will ruin more takes than many creators expect.
Where this method breaks down
The biggest problem is quality loss. You're recording a playback of the video, not working from the source file. If the browser stutters, the audio drifts, or the interface leaks into frame, you've baked that mess into the clip.
The second problem is time. You have to play the segment in real time to capture it, then trim it afterward, then often reformat it for vertical. That's tolerable once. It gets old fast when you need multiple clips per upload.
Here's the trade-off in plain terms:
| Method | Speed to first clip | Quality control | Best use case |
|---|---|---|---|
| Native YouTube tools | Fast | Limited | Quick sharing or basic Shorts |
| Screen recording | Moderate | Inconsistent | Temporary capture or non-owned source preview |
| Source-file editing | Slower to set up, faster at scale | High | Repeatable short-form production |
If you're clipping from someone else's content for commentary, screen recording can also create a false sense of safety. Recording your screen doesn't remove copyright issues. It just changes the capture method.
A lot of beginners mistake “possible” for “efficient.” Screen recording is possible. Efficient is another story.
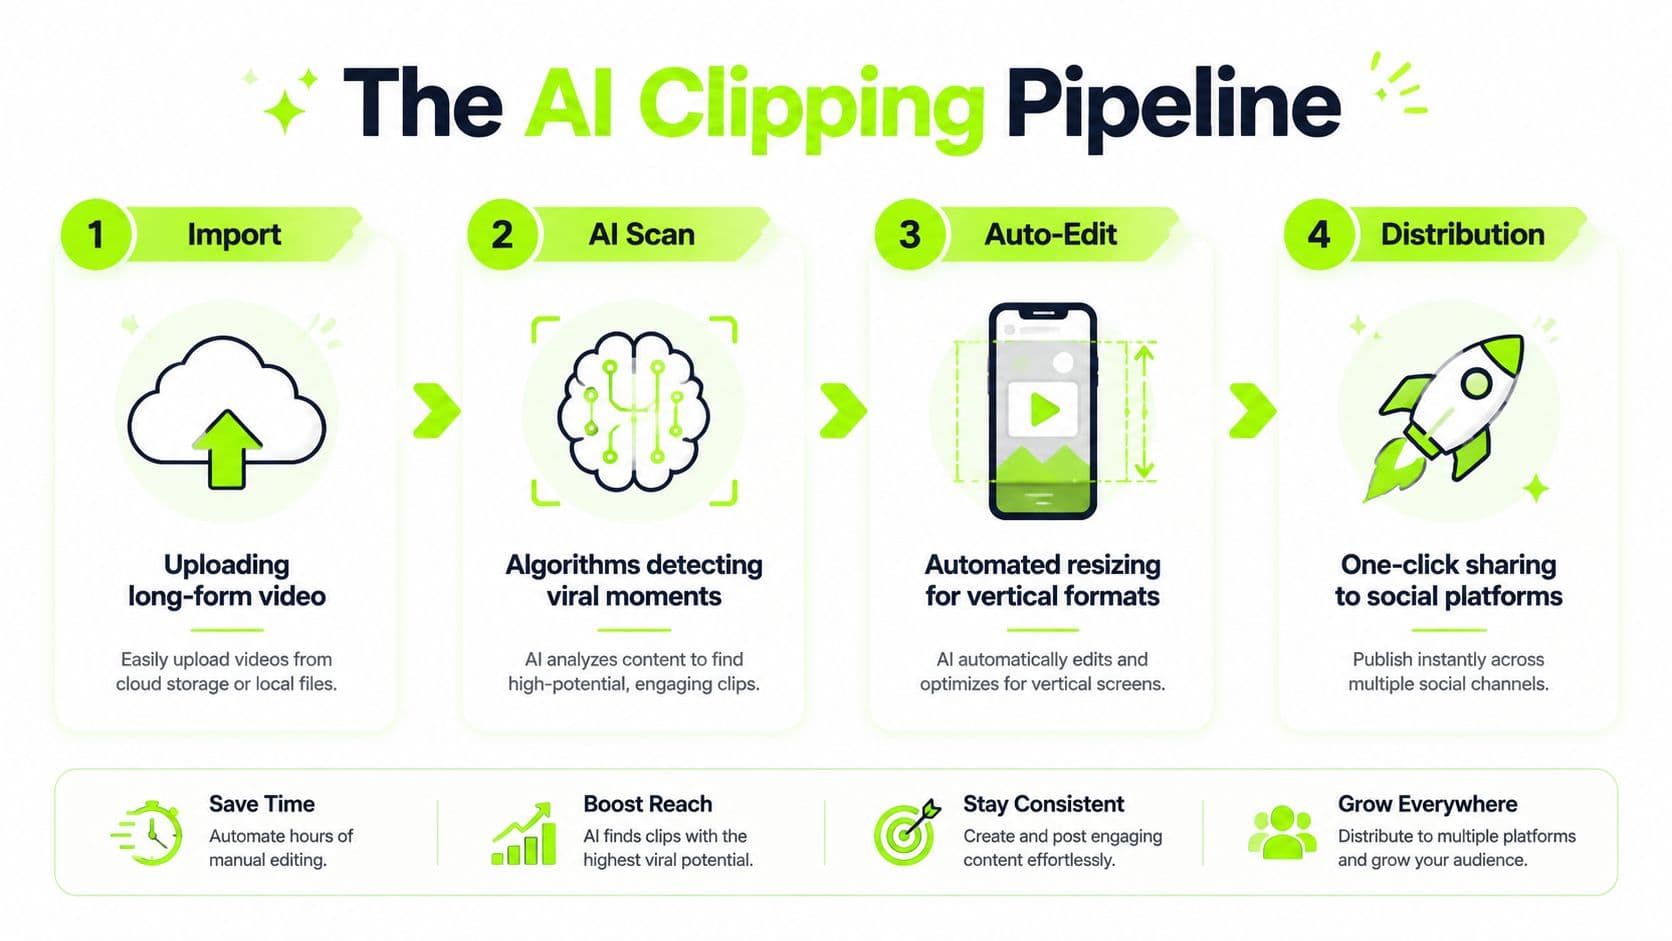
Method 3 The Pro Workflow with AI Clipping
The workflow that scales isn't the one with the fewest buttons. It's the one that finds strong moments quickly, preserves source quality, and lets you ship multiple clips without turning every video into a manual edit marathon.
That usually means working from the original file, not from a screen capture.
The workflow serious creators actually use
For videos you own, the cleaner process starts in YouTube Studio. Download the original MP4, then move it into a browser-based AI editor. According to this workflow breakdown from Revid AI, the pro approach is to pull the source file from YouTube Studio and use AI-assisted editing tools that can identify retention hooks automatically.
That same source notes that AutoClip can identify retention hooks with a 92% success rate and Clip Finder can semantically search transcripts with 95% accuracy. Those two features matter because they solve the most annoying part of clipping: locating the exact moments worth cutting.
A clean pro workflow looks like this:
- Download the source file from YouTube Studio.
- Upload it to a browser editor so you can work without local software.
- Run transcript or waveform analysis to surface possible hooks.
- Review the suggestions manually and cut with context, not just speed.
- Reframe for vertical if the destination is Shorts, Reels, or TikTok.
- Add captions and audio cleanup before export.
What are the common questions?
What is the short answer for Master Viral Content: How to Take Clips from YouTube Videos?
Learn how to take clips from YouTube videos. Explore 3 methods: native tools & AI clippers. Get a step-by-step guide to create viral Shorts, Reels, & TikToks.
What should creators do first?
Review the edit: Cuts, overlays, captions, reframing, and narration can help, but only if they support a new use.
Who is this guide for?
This guide is for YouTube creators, faceless channel operators, agencies, and teams using AI tools to improve video production and growth.
Action checklist
Apply this to your channel today.
- 1Review the edit: Cuts, overlays, captions, reframing, and narration can help, but only if they support a new use.
- 2Keep the frame vertical: Full-screen mobile video usually gives the clip a better chance to hold attention.
- 3Use readable captions: Many viewers watch muted first, then decide whether to turn sound on.
- 4Cut hard at the end: Don't let the clip fade out or drift after the key line lands.
- 5Write the caption for curiosity: The post text should set context or raise a question, not repeat the spoken audio.