What is the quick answer?
Master editing YouTube Shorts with our complete guide. Learn the workflow for planning hooks, rapid editing, captions, and growth tips to create viral videos.
Key takeaways
- Why Your Editing Workflow Is a Growth Lever
- Your workflow needs two things
- The 3-Second Rule and Vertical Framing
- Hook first, edit second
- Frame for the feed, not for landscape habits
- Your Rapid Editing Workflow for Maximum Pacing
Overview
Most creators think virality comes from the idea. On Shorts, it usually comes from the edit. That isn't a creative hot take. It lines up with how YouTube built the format itself: Shorts became a native, in-app creation workflow with tools like Sound, Text, Voiceover, Timeline, and Filters, and by 2024 Shorts were getting over 70 billion views per day according to this Shorts platform overview. The point is simple. You're not competing with better filmmakers. You're competing with faster, clearer editors.
I wish more creators understood this earlier. Editing YouTube Shorts isn't cleanup after filming. It's your retention strategy. Every cut either creates momentum or kills it. Every caption either improves clarity or clutters the screen. Every sound choice either sharpens the moment or distracts from it. If viewers swipe, the edit usually gave them a reason.
Why Your Editing Workflow Is a Growth Lever
The gap between a Short that stalls and a Short that spreads usually isn't luck. It's a repeatable editing system.
That matters more now because Shorts is no longer a side format. YouTube launched Shorts in 2020, kept expanding the creation flow, and turned editing into a mobile-first process built around speed and iteration. If the platform is engineered for rapid assembly, slow and sloppy editors get buried.
Creators who grow on Shorts stop treating editing like post-production. They treat it like audience control. A cut resets attention. A caption guides the eye. A sound cue adds emphasis. A pause, if it stays too long, invites the swipe.
Editing YouTube Shorts is really the art of earning one more second, then one more after that.
Long-form habits can hurt you here. In a regular video, a slower build can work. In Shorts, viewers decide fast and leave faster. That means your workflow has to be lean enough to produce consistently and sharp enough to protect pacing on every upload.
Your workflow needs two things
If you're still editing one-off, instinct-only, you're making growth harder than it needs to be. A channel gets easier to scale when editing becomes a system. If you want the broader channel strategy side of that, this guide on how to grow a YouTube channel fast fits well with the retention-first mindset.
- Speed: You need a process that lets you move from raw clip to finished Short without turning every upload into a half-day project.
- Consistency: You need repeatable decisions. Where the hook lands, how captions appear, when you cut silence, when you change visuals.
- Feedback: You need a loop that lets you improve from one Short to the next instead of starting from zero each time.
The 3-Second Rule and Vertical Framing
A weak opening can't be rescued in the timeline. If the first moments feel slow, confusing, or visually flat, no transition pack is saving that Short.

Hook first, edit second
Before you edit anything, decide what the viewer sees and hears immediately. Not your intro. Not your setup. The strongest moment.
That might be the result, the contradiction, the mistake, the reveal, or the line that makes someone need the next sentence. Shorts rewards creators who start inside the interesting part, then fill in context only after attention is secured.
Here's the test I use: if you mute the video and only watch the opening frames, do you still feel pulled in? If not, the hook is too weak or too delayed.
A practical way to plan it:
Practical rule: Don't open with throat-clearing. Open with the reason the video deserves a watch.
- Pick the sharpest promise: What's the one thing this Short delivers?
- Lead with proof: Show the outcome, the visual payoff, or the most surprising line first.
- Delay explanation: Let curiosity carry the viewer into the next beat.
Frame for the feed, not for landscape habits
A lot of creators technically shoot vertical and still frame badly. The result looks cramped, caption-unfriendly, or awkward once cropped.
Your subject should usually live near the center with intentional breathing room for text. Don't jam your face or product into the very top or bottom and hope the edit fixes it later. That's how you end up fighting your own footage while placing captions and overlays.
Good vertical framing usually means:
If you're not sure how to prep the frame correctly, this quick guide on YouTube Shorts video size helps lock in the format before you start cutting.
A native-looking Short feels designed for the feed before the editor even opens. That's why filming choices matter so much. Editing YouTube Shorts starts at capture.
- Center-weighted composition: Keep the main subject where the feed naturally pulls the eye.
- Caption space: Leave clean areas where text can sit without covering mouths or key actions.
- One focal point: Shorts gets messy fast when multiple elements fight for attention.
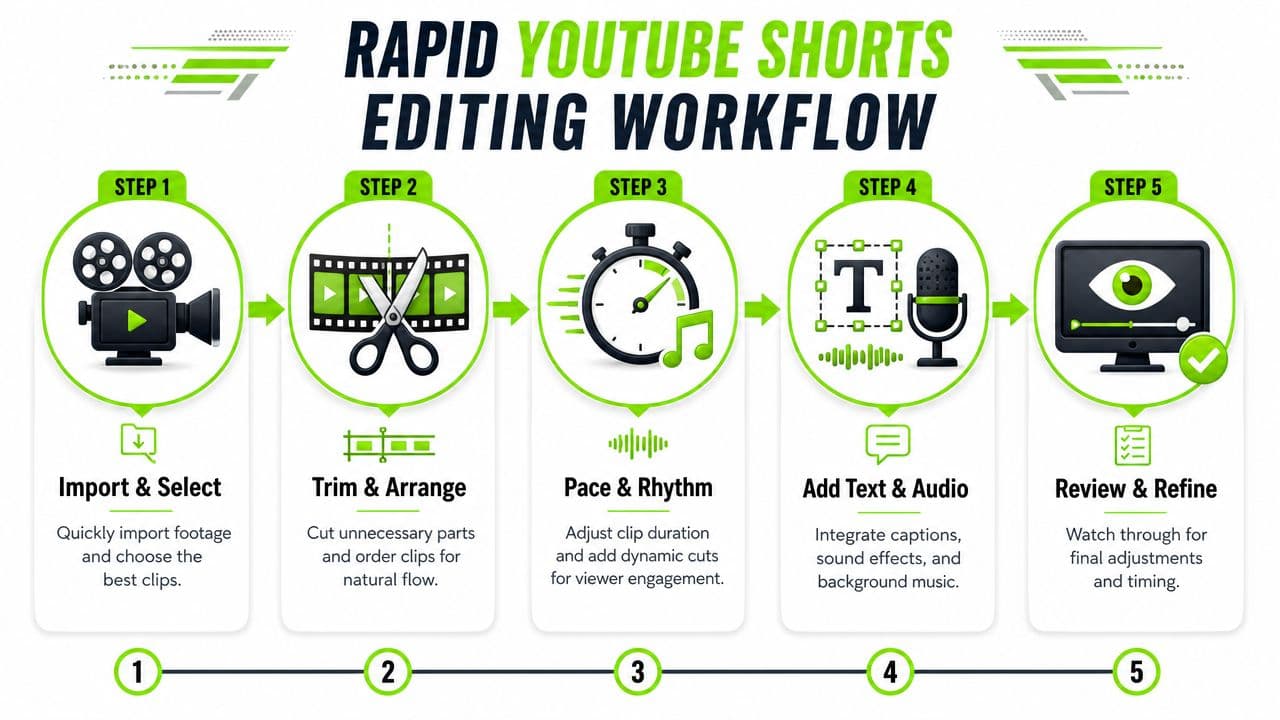
Your Rapid Editing Workflow for Maximum Pacing
Perfectionism kills short-form momentum. Fast, sharp, repeatable beats polished and slow almost every time.
Start with the rough cut. Pull in your best clip, trim hard, and build around forward motion. The benchmark I'd use for energetic Shorts is simple: keep individual shots at about 2 seconds or less and use jump cuts to remove silences, as recommended in this short-form editing tutorial. That's the kind of pacing that keeps viewers from feeling drag.
Build momentum before polish
My default workflow is ruthless.
A useful retention rhythm is to create visual change every 5 to 7 seconds, layer at least two attention elements such as B-roll plus animated text or sound effects, and finish with a loop-friendly ending, based on these practical Shorts editing recommendations. Notice what that advice implies. You don't need nonstop chaos. You need regular refresh points.
Here's how that looks in practice:
| Edit stage | What I'm checking |
|---|---|
| Rough cut | Is the hook immediate and clear? |
| Pacing pass | Are any clips lingering too long? |
| Attention pass | Does the screen change before it feels stale? |
| Clarity pass | Do text and visuals support the same point? |
| Ending pass | Does the final beat restart the Short smoothly? |
If you repurpose longer videos, tools that help identify strong moments can save time. For example, Clip Finder is built for locating usable segments faster so you're not scrubbing manually through everything.
A good walkthrough helps when you want to see pacing choices in action:
- Cut silence immediately: Tiny dead spaces feel huge on Shorts.
- Trim to the point: If a line still works without the first few words, cut them.
- Change the picture often: Even if the topic stays the same, the visual shouldn't sit still too long.
- Lock structure before effects: Fancy additions hide weak pacing for a moment, then the retention drop catches up.
Use movement without turning the video into chaos
A static talking head rarely holds up on Shorts unless the story is exceptional. But that doesn't mean you should throw every motion trick at the timeline.
Use simple zooms, reframes, tracking, and cutaways to accent the moment. Add movement when energy dips or when you need to redirect the eye. Don't add movement because the screen feels empty. Empty and clear beats busy and confusing.
Over-editing usually looks like effort. Good editing looks invisible.
That's the standard. If the viewer notices the effect more than the idea, the edit is doing too much.
The Polish Layer Captions Audio and Music
Polish is where retention gets protected or destroyed.
Creators lose viewers here because they treat captions, music, and sound effects like decoration. They are timing tools. Every word on screen, every audio hit, every volume change should make the next second easier to watch.
Captions are part of the edit
Good captions pull the eye to the right word at the right moment. That keeps viewers oriented, especially in a fast Short where missing one phrase means missing the whole point.
Bad captions kill retention fast. They lag behind the speaker, cover the subject, or dump too many words on screen at once. The viewer has to choose between reading and watching, and that friction costs watch time.
Use captions with intent:
If you want to speed up subtitle timing without babysitting every line, a quick subtitle workflow tool can cut a lot of manual cleanup.
- Sync them tightly: Put the text on screen when the important word lands.
- Trim aggressively: Short phrases read faster than full sentences.
- Place them around the action: Keep faces, products, and demonstrations visible.
- Highlight key words sparingly: Emphasis works when everything is not shouting.
Audio should drive clarity
Start with the voice track. If the sentence takes too long to get to the point, cut earlier. If a pause adds nothing, remove it. If a word needs punch, tighten the gap before it so the emphasis lands harder.
That is editing for retention, not just neatness.
Music should add momentum without fighting the message. Keep it low enough that speech stays effortless to understand. If viewers have to strain to catch the line, the music is too loud. If the track changes the mood of the point, it is the wrong track.
Sound effects need discipline. Use them to mark a turn, a reveal, or a visual change. One clean impact can sharpen a moment. Ten effects in fifteen seconds makes the Short feel cheap and noisy.
My default polish checklist is simple:
That is enough to make most Shorts feel sharp. Complex styling rarely saves a weak edit. Clear captions and controlled audio keep people watching.
- Captions that match speech timing
- Voice that sounds clean and direct
- Music that supports energy without covering words
- Sound effects used only on moments that deserve emphasis
What are the common questions?
What is the short answer for Editing YouTube Shorts: A Guide to Creating Viral Videos?
Master editing YouTube Shorts with our complete guide. Learn the workflow for planning hooks, rapid editing, captions, and growth tips to create viral videos.
What should creators do first?
A real promise: The frame matches the hook and payoff
Who is this guide for?
This guide is for YouTube creators, faceless channel operators, agencies, and teams using AI tools to improve video production and growth.
Action checklist
Apply this to your channel today.
- 1A real promise: The frame matches the hook and payoff
- 2Readable contrast: The main subject stands out immediately
- 3Visual loop: The ending lands on a shot that closely matches the opening frame
- 4Audio loop: The last word, sound, or beat sets up the first line again
- 5Idea loop: The final statement reframes the hook so the restart feels satisfying