Trim and split MP4 clips
Remove unwanted starts and endings, split longer footage into smaller clips, and tighten pauses on the timeline.
Online MP4 editor
Import one or more MP4 files, trim and split clips, rearrange the timeline, add captions, text, music, voiceover, and transitions, then export one clean MP4 video from your browser.
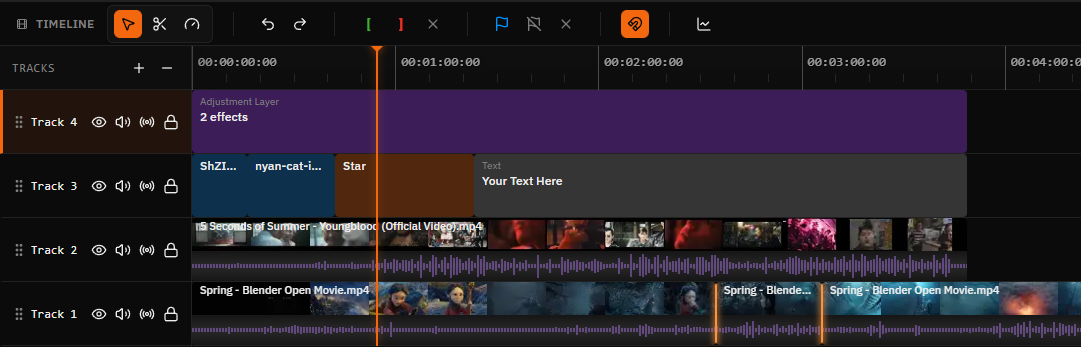
One MP4 workflow
MP4 is supported as both an input and an output. Start with the files you already have, make timeline-level changes, and keep a broadly compatible MP4 for publishing or sharing.
Remove unwanted starts and endings, split longer footage into smaller clips, and tighten pauses on the timeline.
Import more than one MP4, arrange clips in sequence, overlap layers when needed, and export one finished video.
Create horizontal, vertical, square, or custom-size projects for YouTube, Shorts, Reels, TikTok, and presentations.
Layer titles, labels, and subtitles over an MP4, then control their timing and placement in the finished edit.
Place audio on separate tracks, adjust clip timing, and combine footage with narration, music, or sound effects.
Download the completed project as a broadly compatible MP4. H.264 is the editor's default MP4 video codec.
Step by step
Open the browser editor and choose a standard horizontal, vertical, square, or custom canvas size.
Select one or several MP4 videos. Add each source clip to the media library and timeline.
Trim, split, move, layer, crop, caption, and mix the clips while reviewing the result in the preview.
Choose MP4 and H.264 in the export dialog, render the project in the browser, and download the result.
Common MP4 jobs
A dedicated timeline gives you control over clip order, layers, timing, format, and audio. That matters when the job starts as a simple MP4 cut and grows into a finished video.
Import MP4, MOV, WebM, AVI, or MKV source footage
Mix video with images, text, captions, music, and voiceover
Choose horizontal, vertical, square, or custom dimensions
Export MP4, MOV, WebM, or MKV from the browser
| MP4 editing task | What to do in Satura |
|---|---|
| Shorten one MP4 | Trim the clip edges or split and delete the unwanted section. |
| Join MP4 clips | Place multiple MP4 files end to end on the same timeline track. |
| Make a vertical version | Use a 9:16 project and reposition each clip inside the frame. |
| Add subtitles | Create or import captions, edit the words, and style their placement. |
| Add narration or music | Import audio or create a voiceover, then adjust timing on audio tracks. |
| Keep MP4 output | Export as MP4 with H.264 video and compatible audio settings. |
Combine MP4 files
To merge MP4 files, import the clips together and place them end to end on the timeline. Reorder the sequence, trim overlaps or gaps, add transitions if they help, and export the entire project as one MP4.
Because each source can have different dimensions, frame rates, or codecs, review the complete sequence before export instead of assuming every MP4 file is technically identical.
Import several MP4 files at once
Place clips in the intended order
Trim cuts and remove unwanted frames
Export the sequence as one MP4
MP4 basics
Two files ending in .mp4 can contain different video and audio codecs. Satura accepts MP4 input and defaults to H.264 video for MP4 export because it is a practical compatibility choice for browsers, social platforms, and common playback devices.
If a particular MP4 will not preview, the codec inside the file may not be supported by the current browser or device. Re-encode the source to H.264/AAC or try a browser with the required media support before editing.
Container
Holds the video, audio, captions, and metadata streams.
Default video codec
A broadly compatible choice for online video delivery.
Audio
Reviewed with the rest of the export settings before render.
MP4 editor FAQ
Open Satura's browser editor, create a project, and import the MP4 file. Add it to the timeline to trim, split, crop, resize, add text, captions, music, voiceover, transitions, or effects. When the edit is ready, export it as an MP4 and download the result.
Yes. Import the MP4 files together, place them end to end on the timeline, reorder them, trim any unwanted footage, and export the sequence as one MP4. You can also add transitions, text, captions, images, and audio before exporting.
You can start editing MP4 videos with Satura's free browser editor. No credit card or desktop download is required to begin. The editor also offers optional credit-based AI generation and processing features.
No. Standard video editor exports do not add a Satura watermark to the finished MP4.
MP4 is the default video container and H.264 is the default video codec. You can review resolution, frame rate, quality, audio, and other available settings in the export dialog before rendering.
Yes. Satura runs in a supported web browser, so you can edit MP4 files on a Chromebook without installing a desktop video editor. Performance still depends on the Chromebook, source footage, effects, and project length.
The media library accepts MP4, WebM, MOV, AVI, and MKV video files, plus common audio and image formats. Actual playback support can depend on the codec inside the file and the browser or device.
Related workflows
Mute unwanted MP4 sound while keeping the picture and timeline edits.
Import music, narration, or effects and mix them with the original video sound.
Slow down or speed up MP4 clips and render the changed duration.
Arrange multiple source clips and export one combined video.
Shorten a clip or cut an unwanted section from the middle.
Change canvas dimensions and reframe video for a new shape.
Fix sideways MP4 clips, set an exact angle, or flip the picture.
Create timed titles, labels, lower thirds, and calls to action.
Explore the complete browser timeline and editing feature set.
Edit on ChromeOS with no desktop software installation.
Use AI-assisted generation and editing inside the same workspace.
Create timed captions and continue the edit in Satura.
Create a project, import your footage, and finish the edit in your browser.