What is the quick answer?
Learn how to slow down an Instagram video using the Reels editor, your phone's native tools, or an advanced online editor. Get pro tips on audio and quality.
Key takeaways
- Why Slow Motion Is Your Secret Weapon for Engagement
- What slow motion actually does for a Reel
- Three ways to do it, depending on the job
- The Quickest Fix Using the Instagram Reels Editor
- How to slow a clip inside Reels
- When this method works well
Overview
You've probably got a clip sitting in your camera roll right now that looked great when you shot it, then felt underwhelming the second you watched it back. The jump landed too fast. The hair flip disappeared. The product reveal lasted half a breath. That's usually not a bad shot problem. It's a pacing problem.
Knowing how to slow down an Instagram video fixes that fast, but the method matters. Sometimes the native Reels tool is enough. Sometimes your phone's editor gives you a cleaner result. And sometimes you need full control over where the clip speeds up, where it slows down, and how smooth that transition feels.
Why Slow Motion Is Your Secret Weapon for Engagement
A fast clip can be technically fine and still fail on Instagram. If the important moment flies by, people don't get enough time to register what they're seeing. Slowing the right moment gives the eye somewhere to land, and that changes how the whole video feels.
That matters because Instagram counts a video view after 3 seconds of watching, according to Social Status's Instagram video benchmark overview. That's a tiny window. You don't have time for a lazy intro, and you definitely don't have time for the key action to blur past before the viewer understands it.
What slow motion actually does for a Reel
Used well, slow motion does three useful things at once:
It's not magic, though. Slow motion won't rescue a boring clip. It works when there's already a visual payoff in the footage and you want to make that payoff easier to feel.
Slow motion works best when you use it to emphasize a moment, not to decorate a weak one.
If you're also trying to improve overall performance on Reels, captions, hooks, pacing, and posting choices matter just as much. A good companion read is this step-by-step Instagram engagement guide, especially if your videos look decent but still don't get traction.
- Highlights detail so the viewer catches the exact action you want them to notice
- Builds anticipation by stretching a moment that would normally vanish
- Makes simple footage feel more intentional even if the original shot was casual
Three ways to do it, depending on the job
I think of slow-motion workflows in three buckets:
| Method | Best for | Trade-off |
|---|---|---|
| Instagram Reels editor | Fast edits right before posting | Convenient, but less precise |
| Phone editor | Existing footage already saved to your device | Better control, still simple |
| Browser editor with speed ramping | Cinematic pacing and selective speed changes | More setup, much cleaner creative control |
If you make short-form content across platforms, it helps to think beyond Instagram too. A lot of the same pacing principles that improve Reels also improve retention elsewhere, including the hook strategies in this guide on how to increase views on YouTube for free.
The Quickest Fix Using the Instagram Reels Editor
If you need the fastest route, stay inside Instagram. The Reels editor is the in-a-pinch option when you want to slow a clip down without exporting, re-uploading, or opening another app.
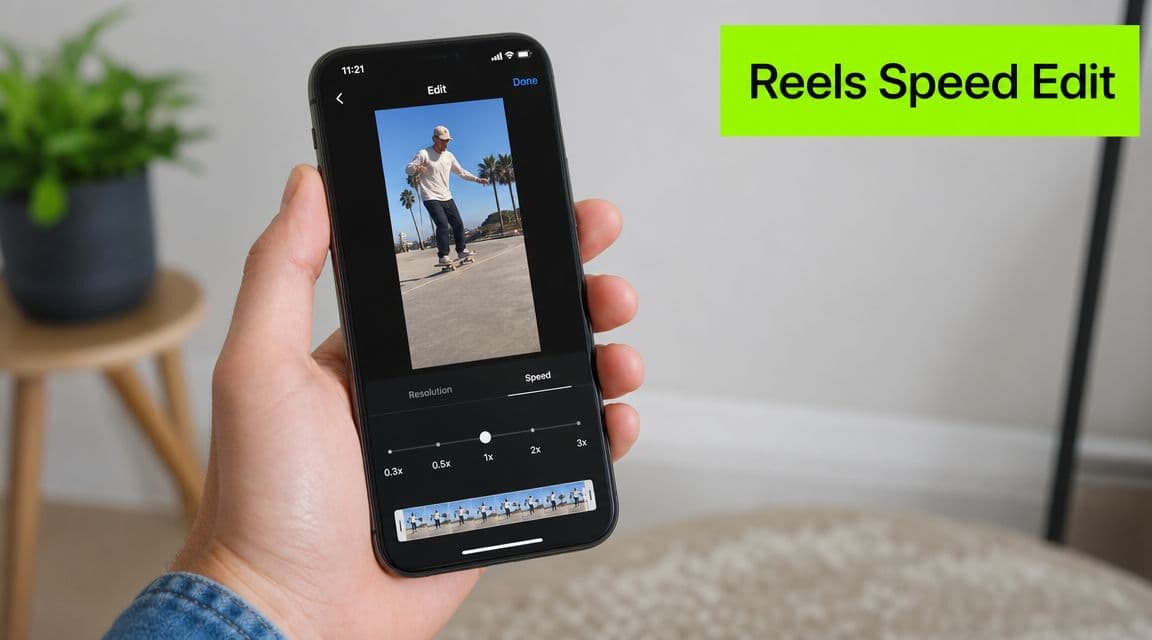
Instagram's own Reels editing flow allows a selected clip to be slowed from 1.0x to 0.1x, which means the clip can play at one-tenth of its original speed, as shown in this Instagram Reels speed control walkthrough. That's enough for dramatic slow motion on basic edits, and it's why the native tool is useful for quick posting.
How to slow a clip inside Reels
Open Instagram and start a Reel. You can record something fresh or import a video from your camera roll.
Once your clips are in the timeline, tap the clip you want to adjust. Look for the speed control in the editor. Select the slower playback option that fits the shot, preview it, and watch the motion closely before you publish.
The part that trips people up is this: not every clip in a Reel needs the same speed. If one section looks better slowed but the rest feels sluggish, only apply the slowdown to the specific clip that carries the visual payoff.
When this method works well
This is the method I'd use for:
It's also handy if you're already assembling the full post in Instagram and don't want to break your workflow. For basic trimming and prep before you even get to Reels, a tool focused on editing MP4 videos can make that handoff cleaner.
Practical rule: Use Instagram's speed tool when convenience matters more than precision.
- Last-minute posting when the Reel is almost done and only needs a pacing tweak
- Simple highlight moments like a jump, pour, reveal, spin, or reaction shot
- Creators who don't want extra exports and just need something usable now
Where the native tool falls short
The native editor is fine for broad changes. It's not where I go when I need finesse.
Here's what tends to go wrong:
If the source clip is already imperfect, the Reels editor usually exposes the weakness instead of hiding it. That's when exporting a slowed version first gives you a cleaner result.
- Whole sections can feel dragged out if you slow too much of the clip
- Transitions may feel abrupt because you're applying a simple speed change, not shaping a speed curve
- Existing footage sometimes needs more care than Instagram's quick editor gives you
Slowing Down Existing Videos with Your Phone Editor
You already have the shot. The decision now is whether to slow it down before Instagram sees it.
That matters more than it sounds. Editing the clip in your phone's editor gives you a finished file you can inspect, re-export, and reuse. It takes a little longer than tapping a speed control inside Reels, but it usually gives better results for footage that was shot earlier and needs more care.
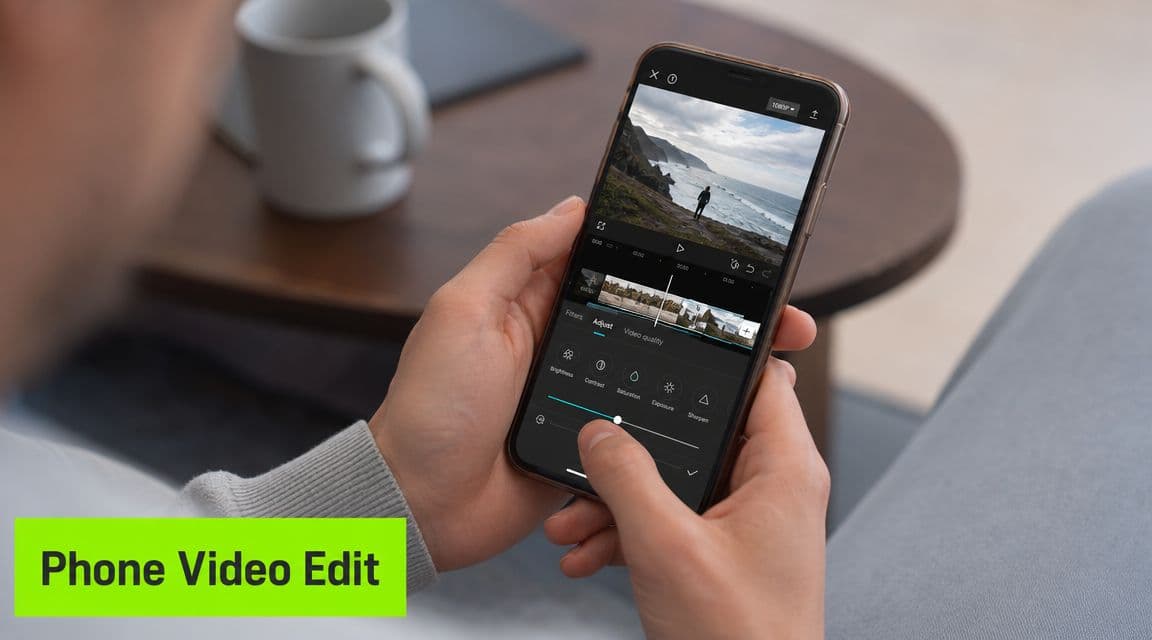
I use this route when the clip already lives in Photos, Google Photos, or my camera roll and I want to judge the slowdown on its own terms before building the Reel around it. For one clean moment, like a trick landing, a product turn, or a splash, the phone editor is often the right middle ground between Instagram's quick tool and a full timeline edit.
A simple workflow for iPhone and Android
The buttons change by device, but the process stays close to the same:
On iPhone, that usually means Photos for supported clips or iMovie if I need a bit more control. On Android, Google Photos or the built-in editor is often enough for a basic slowdown.
If your phone editor feels cramped, a browser-based free video editor for exporting slowed clips gives you a larger workspace without adding another app to your phone.
- Open the original clip in your gallery or default editing app
- Find the speed control and reduce playback until the key action has enough room
- Watch the full clip back so the slowed section still feels natural in context
- Save a new version instead of overwriting the source file
- Upload the exported file to Instagram after you confirm the motion looks clean
Why export first instead of editing only in Instagram
Exporting first solves a different problem than the Reels speed tool. It is less about convenience and more about quality control.
Here's the trade-off:
| Reason | Why it matters |
|---|---|
| You can inspect the final motion | Choppy playback, awkward timing, and shaky frames are easier to catch before upload |
| You can reuse the clip elsewhere | The same slowed asset can go to Stories, Shorts, TikTok, or an ad cut |
| You keep Instagram focused on publishing | The posting app handles assembly, while your edit decisions happen earlier |
This method also helps with framing. If you need to crop or position the video for vertical posting before it reaches Instagram, doing that during export reduces last-second surprises.
What usually works and what usually doesn't
Phone-editor slowdown works best when the clip has one obvious payoff and decent source quality.
Good candidates:
Bad candidates:
One rule has held up for me: if the original clip looks soft or messy at normal speed, slowing it down rarely fixes it.
For most creators, this is the practical middle option. It gives you more control than Instagram's native slowdown, without committing to the frame-by-frame shaping you'd use for a more designed speed effect.
- a skate clip with one clean trick
- a product shot where the reveal happens too fast
- a travel shot with a turn, splash, or movement that needs more breathing room
- footage that already feels slow at normal speed
- dark clips with heavy motion blur
- shaky handheld video where slowing it down makes the instability more obvious
What are the common questions?
What is the short answer for How to Slow Down an Instagram Video: 3 Easy Methods?
Learn how to slow down an Instagram video using the Reels editor, your phone's native tools, or an advanced online editor. Get pro tips on audio and quality.
What should creators do first?
Preview repeatedly
Who is this guide for?
This guide is for YouTube creators, faceless channel operators, agencies, and teams using AI tools to improve video production and growth.
Action checklist
Apply this to your channel today.
- 1Preview repeatedly
- 2sports or movement clips where impact timing matters
- 3fashion and beauty footage with turns, hair movement, or gesture-based reveals
- 4product videos where the object enters frame, rotates, or lands on the reveal angle
- 5transition edits where pace is part of the style