What is the quick answer?
Confused by resolution scaling? Learn how to upscale, export, and repurpose video for sharper results and better performance on YouTube and TikTok.
Key takeaways
- Why Your 4K Video Looks Blurry on TikTok
- The real problem is translation
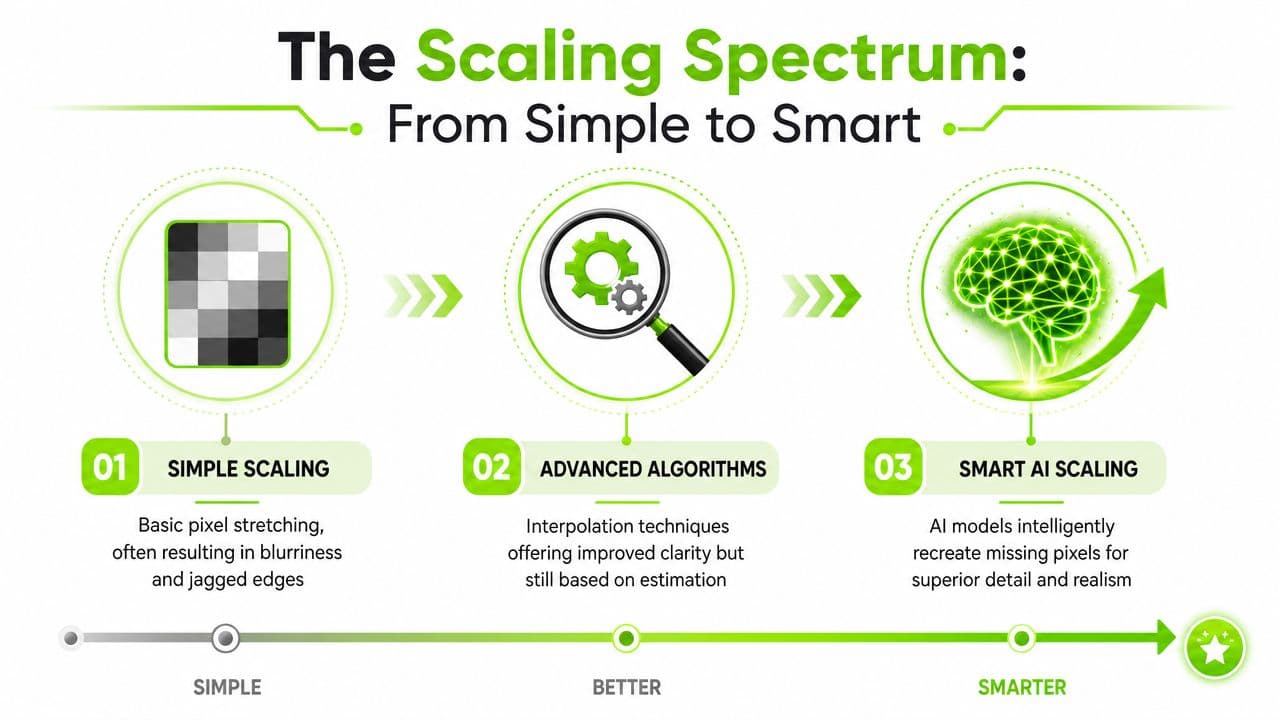
- The Scaling Spectrum From Simple to Smart
- Why some resizing looks cheap
- Comparison of Traditional Scaling Methods
- Where dynamic scaling fits
Overview
You export a crisp video. It looks great in your editor. Then you upload it to TikTok, Shorts, or Reels and suddenly the face is softer, text edges look mushy, and the whole thing feels like your hard drive and the platform had an argument.
That frustration usually isn't about your camera. It isn't even always about your edit. It's about resolution scaling, which is the quiet layer between the file you make and the version your audience sees.
Most creators treat scaling like a settings tab they'll fix later. That's backwards. If you understand how scaling works, you make better decisions earlier. You crop smarter, export faster, repurpose with less damage, and stop feeding platforms files that fall apart the second compression hits them.
Why Your 4K Video Looks Blurry on TikTok
You export a crisp 4K cut from Premiere, upload it to TikTok, and then watch the posted version on your phone. The face is softer. Fine detail in hair and fabric drops out. Captions that looked clean in the edit start to smear. That drop in quality catches a lot of creators off guard because the file you upload is not the file viewers end up seeing.
TikTok runs your video through its own delivery pipeline. Your edit timeline, aspect-ratio conversion, export settings, bitrate, and the platform's compression all shape the final image before it reaches the feed. If any step is weak, the platform has less clean data to work with.
That is the creator version of resolution scaling.
For creators, resolution scaling matters less as a graphics term and more as a workflow decision. Every time footage gets resized, cropped, reframed, or recompressed, detail can get thrown away. A horizontal 4K source does not stay pristine if it gets squeezed into a vertical format, exported with thin bitrate, and compressed again for mobile delivery. The platform is optimizing for fast playback at scale, not for the sharpness of your subtitles, product texture, or close-up skin detail.
The real problem is translation
A vertical platform cares about fit. If your source arrives in the wrong shape, the app has to crop, scale, or both. That extra processing is where many “Why is my 4K blurry?” complaints start.
This is why smart creators make the framing decision before upload, not after. If you need a quick way to preview how your shot will hold up in a vertical crop, the RenderIO TikTok resizer helps you catch bad framing before TikTok makes the decision for you.
One more trap is easy to miss. 4K resolution can hide weak export choices in the edit bay, then fall apart on platform. A large frame with starved bitrate behaves like a glossy poster printed on thin paper. It looks premium at first glance, then the flaws show fast in motion, gradients, and text. If you want a quick pre-export check, this YouTube bitrate calculator is a practical way to size your file so you are not handing the platform an already compromised master.
I see this most often in repurposing workflows. A creator cuts one YouTube master, pulls clips for Shorts and TikTok at the end, and trusts auto-crop plus a default export preset. That saves time up front, but it often costs retention later because the final video feels softer and less intentional than the original edit.
Practical rule: Judge quality from the exported vertical file, on a phone, before upload. Your timeline preview is not the final product.
Satura AI fits here because it helps creators make these decisions earlier in the workflow. Instead of treating scaling like a last-minute export problem, you can build for the destination format from the start, keep more usable detail, and move faster when it's time to repurpose one shoot across YouTube, Shorts, and TikTok.
The Scaling Spectrum From Simple to Smart
Most creators think resizing is one action. It's really a spectrum. At one end, software stretches or shrinks pixels with basic math. At the other, AI tries to reconstruct detail that isn't fully there anymore.
The easiest analogy is photo editing. Open a small image in a basic editor and enlarge it. The software has to invent what goes between existing pixels. That's why edges get blocky or blurry. More advanced tools do a better job estimating transitions, but they're still estimating.
Why some resizing looks cheap
Simple scaling methods usually prioritize speed. They're fine when you're making rough previews or shrinking footage slightly. They're not great when you're enlarging a compressed talking-head clip and hoping skin texture survives.
More advanced methods like bicubic or Lanczos do a better job preserving edges and smoothing transitions. They can make text overlays, product edges, and motion graphics look more polished. But even the better traditional methods have a ceiling. They don't know what detail was originally present. They only infer.
One practical example from the gaming side explains the trade-off well. When resolution scale is set below 100%, the GPU renders at a lower resolution, such as 1280×720 at 50% of 2560×1440, and then upscales the image to the full display size, trading fine detail for better performance while still showing a full-sized frame on screen, as described in this Level1Techs discussion of resolution scale. For creators, the equivalent mistake is editing or repurposing from a low-detail source and expecting the export settings to magically restore fidelity.
Comparison of Traditional Scaling Methods
| Method | Quality | Speed | Best For |
|---|---|---|---|
| Nearest Neighbor | Sharp but jagged | Very fast | Pixel art, stylized graphics, rough previews |
| Bilinear | Soft and smooth | Fast | Quick exports where detail doesn't matter much |
| Bicubic | Better edge handling | Moderate | General video resizing and cleaner text |
| Lanczos | Often the crispest traditional option | Slower | Final exports where sharpness matters |
There's a workflow lesson here. If your pipeline includes clipping, reframing, captioning, and resizing for multiple platforms, the scaling method isn't a minor setting. It affects every stage after it.
If you compare all-in-one repurposing stacks, this FlowClip content tool comparison is useful because it frames resizing as part of a broader content pipeline rather than a one-click afterthought.
Where dynamic scaling fits
Dynamic resolution scaling is the smart cousin of manual scaling. Instead of staying fixed, it changes internal resolution in real time to maintain a target frame rate while the output resolution stays constant. In gaming, that matters because smooth play often matters more than perfect sharpness in every single frame.
For creators, the lesson isn't “use game settings for video.” It's that adaptive quality choices beat rigid ones when time and hardware are limited. If you're editing on a lighter machine, using lower preview resolution during the cut and higher quality only at export is the same mindset. Don't waste your fastest machine time on the least important stage.
The best scaling workflow isn't the one with the fanciest label. It's the one that protects visible detail at the moment it matters most.
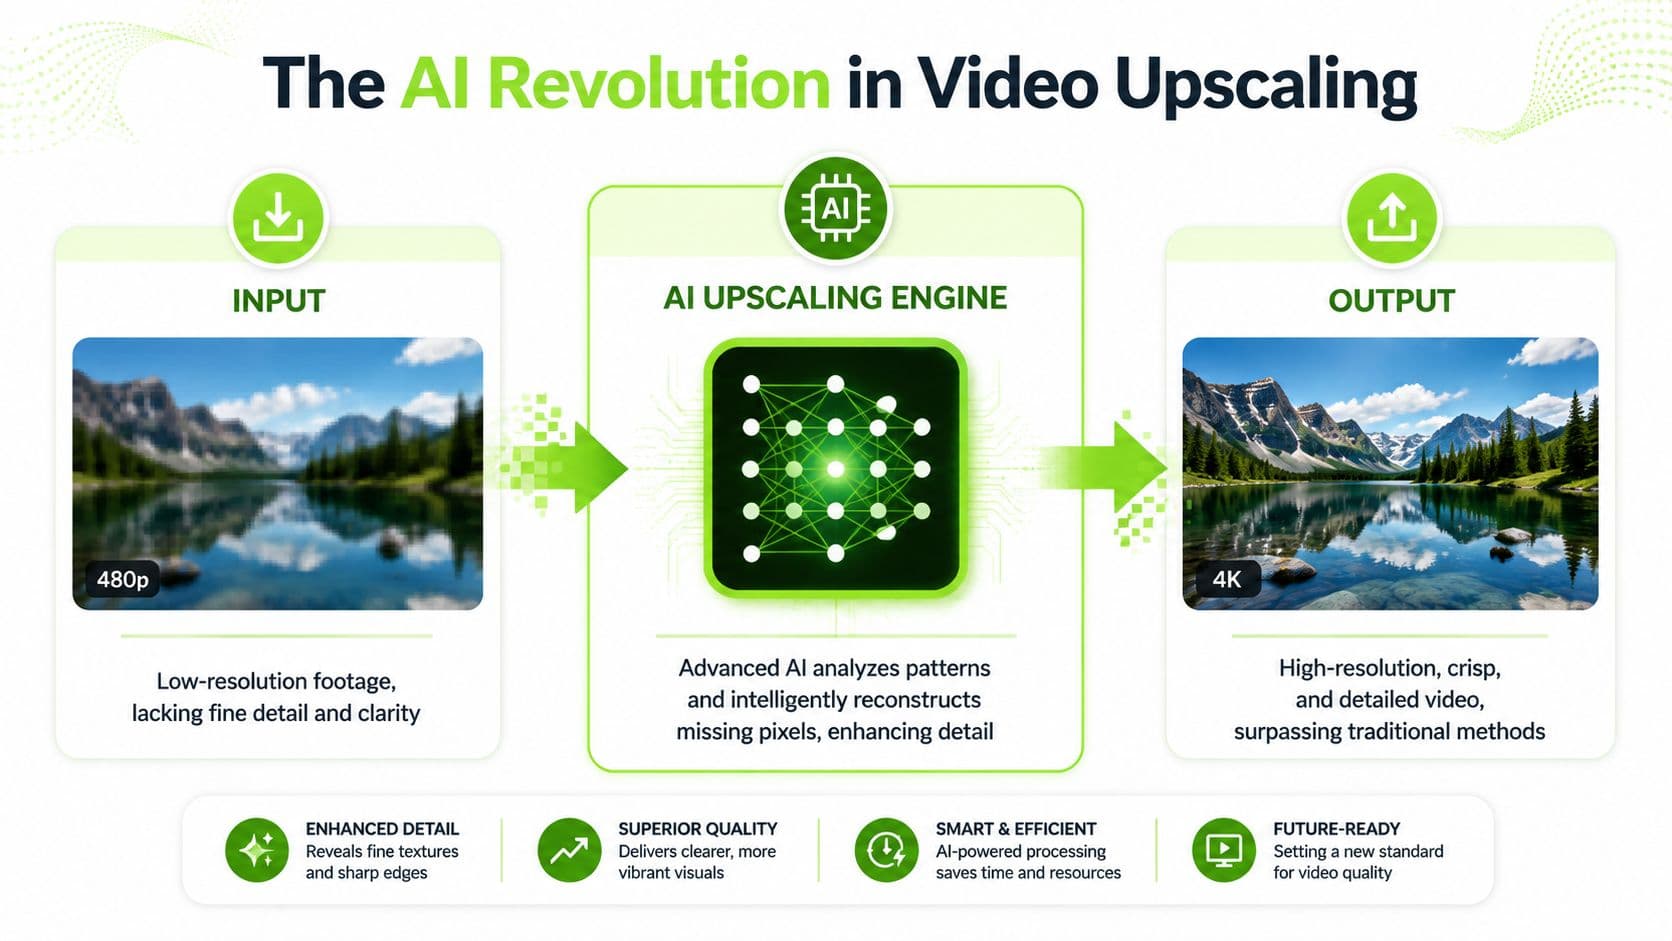
The AI Revolution in Video Upscaling
Traditional scaling stretches. AI upscaling tries to rebuild.
That's why this shift matters. Old-school methods ask, “How do we make this frame bigger?” AI asks, “What should this bigger frame probably look like?”
From guessing pixels to rebuilding them
Creators have already seen this idea from the gaming world through tools like DLSS, FSR, and XeSS. Those systems don't just blow up a lower-resolution image the way an old editor might. They use more context to deliver something sharper and more stable than basic interpolation alone.
That matters for video because creator questions increasingly focus on how resolution scaling interacts with real-time upscalers like FSR, DLSS, and XeSS, especially for short-form and vertical content, while most public explanations still treat scaling as a generic internal render setting instead of a workflow layer, as noted in this iRacing explanation of resolution scaling.
A good visual summary helps here:
For creators, the practical takeaway is simple. AI upscaling can do more than enlarge a frame. It can help clean compression haze, improve edge definition, and make older or lower-quality clips feel more usable in a modern feed.
Why creators care now
This isn't just for gamers or VFX people. The same reconstruction mindset now shows up in creator workflows. A podcast clip recorded in less-than-ideal conditions, a downloaded archive segment, or a cropped face cam can all benefit when the upscaler is trying to recover detail instead of merely stretching what remains.
That's also why AI is spreading beyond video. If you've seen tools that upscale product photos with AI, you've already seen the same broader shift. The workflow problem is different, but the core promise is identical: preserve or recover perceived detail when the original asset isn't ideal.
If you want to see how dedicated video tools approach that problem, this breakdown of AI video upscaling with Topaz, Starlight, and Precise 2.5 gives a useful benchmark for what creators now expect from upscale quality.
A working test: If the scaled clip only looks better when paused, the method probably isn't good enough. If it looks better in motion after platform compression, that's the win.
The Creator's Dilemma Quality Versus Cost
You finish a clean edit, export a higher-resolution version to play it safe, wait longer than expected, then watch the platform compress it into something that looks only slightly better than your fast draft. That is the creator version of the scaling problem. More pixels can help, but every extra step taxes your workflow.
Every scaling choice costs something. It might be render time, storage, upload time, preview lag in the editor, or the simple fact that a same-day clip misses the publishing window because the export queue dragged on too long.
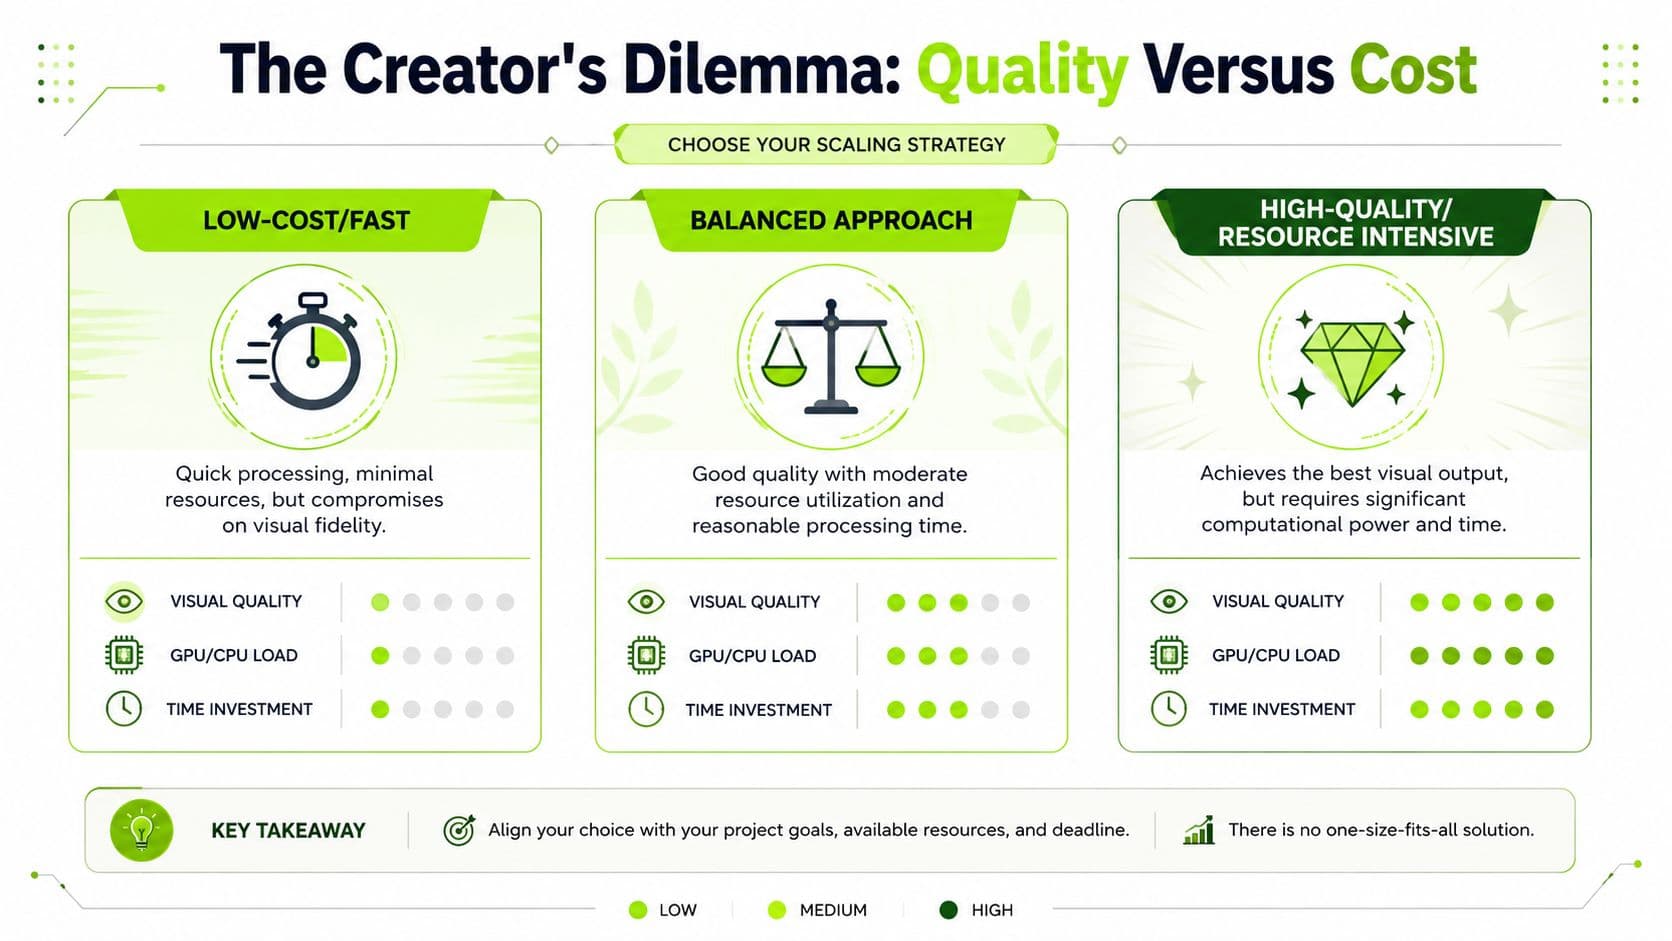
What quality actually costs
Start with compute. Doubling scale does not mean doubling effort. Pixel count rises fast, which is why aggressive scaling can turn a light project into a sluggish one. In practical creator terms, if you upscale too early, every cut, subtitle pass, effect, and revision gets heavier before the viewer gets any benefit.
Then there is time.
For a busy YouTube creator, consistency usually beats chasing theoretical maximum quality on every upload. A clip that gets out today at strong quality often performs better than a marginally sharper version that slips a trend, misses a sponsor deadline, or slows down your weekly publishing cadence.
There is also a hidden quality cost. Every time footage bounces between tools, aspect ratios, and export settings, you risk another encode, another compression pass, and another chance to soften text, faces, and motion. That is one reason a tighter stack matters. If your workflow is spread across five apps for clipping, captions, resizing, exports, and testing, you are paying in both speed and image stability. This guide on building a leaner AI tool stack for YouTube production addresses that operational drag directly.
What are the common questions?
What is the short answer for Resolution Scaling: Get Sharper Video & Faster Workflows?
Confused by resolution scaling? Learn how to upscale, export, and repurpose video for sharper results and better performance on YouTube and TikTok.
What should creators do first?
Start with the destination. A YouTube horizontal video, a Short, and a TikTok repost should not share one lazy preset.
Who is this guide for?
This guide is for YouTube creators, faceless channel operators, agencies, and teams using AI tools to improve video production and growth.
Action checklist
Apply this to your channel today.
- 1Start with the destination. A YouTube horizontal video, a Short, and a TikTok repost should not share one lazy preset.
- 2Lock framing before export tweaks. Finish your crop and aspect ratio first so you are not sharpening or upscaling pixels that will get cut.
- 3Use AI scaling where it saves the edit. Older footage, downloaded interviews, webcam clips, and archive B-roll usually benefit most.
- 4Watch playback at full speed. Text, faces, and motion graphics can look fine on a paused frame and fall apart once they move.
- 5Test the published version on the target device. Phone playback catches problems desktop review misses.
- 6Reduce extra handoffs. Every export, re-import, and tool switch creates another chance for compression damage and wasted time.