What is the quick answer?
Master AI video face swap with this creator-focused workflow guide. Learn the pipeline, quality tips, ethics, and packaging for YouTube and short-form content.
Key takeaways
- What an AI Video Face Swap Is
- The illusion holds only if the motion matches
- The Four-Stage Pipeline Behind the Result
- Detection is where bad footage gets exposed
- Generation is fast, but blending decides whether the shot holds up
- Running a Real Production Workflow
Overview
You open a rendered clip and immediately feel that little stomach-drop. The swap is technically impressive, the mouth moves, the expression mostly tracks, and yet something about the face feels borrowed, like it belongs to a different universe than the body it's sitting on. That's the point where most creators either keep clicking generate or blame the app, but the issue is usually the setup, not the button.
An ai video face swap is only useful when you understand what it's doing inside the frame, what footage it can survive, and where the seams will show after export. If you've shipped a few shorts already, you've probably learned the hard way that “good on upload” and “good in the comment section” are very different standards.
What an AI Video Face Swap Is
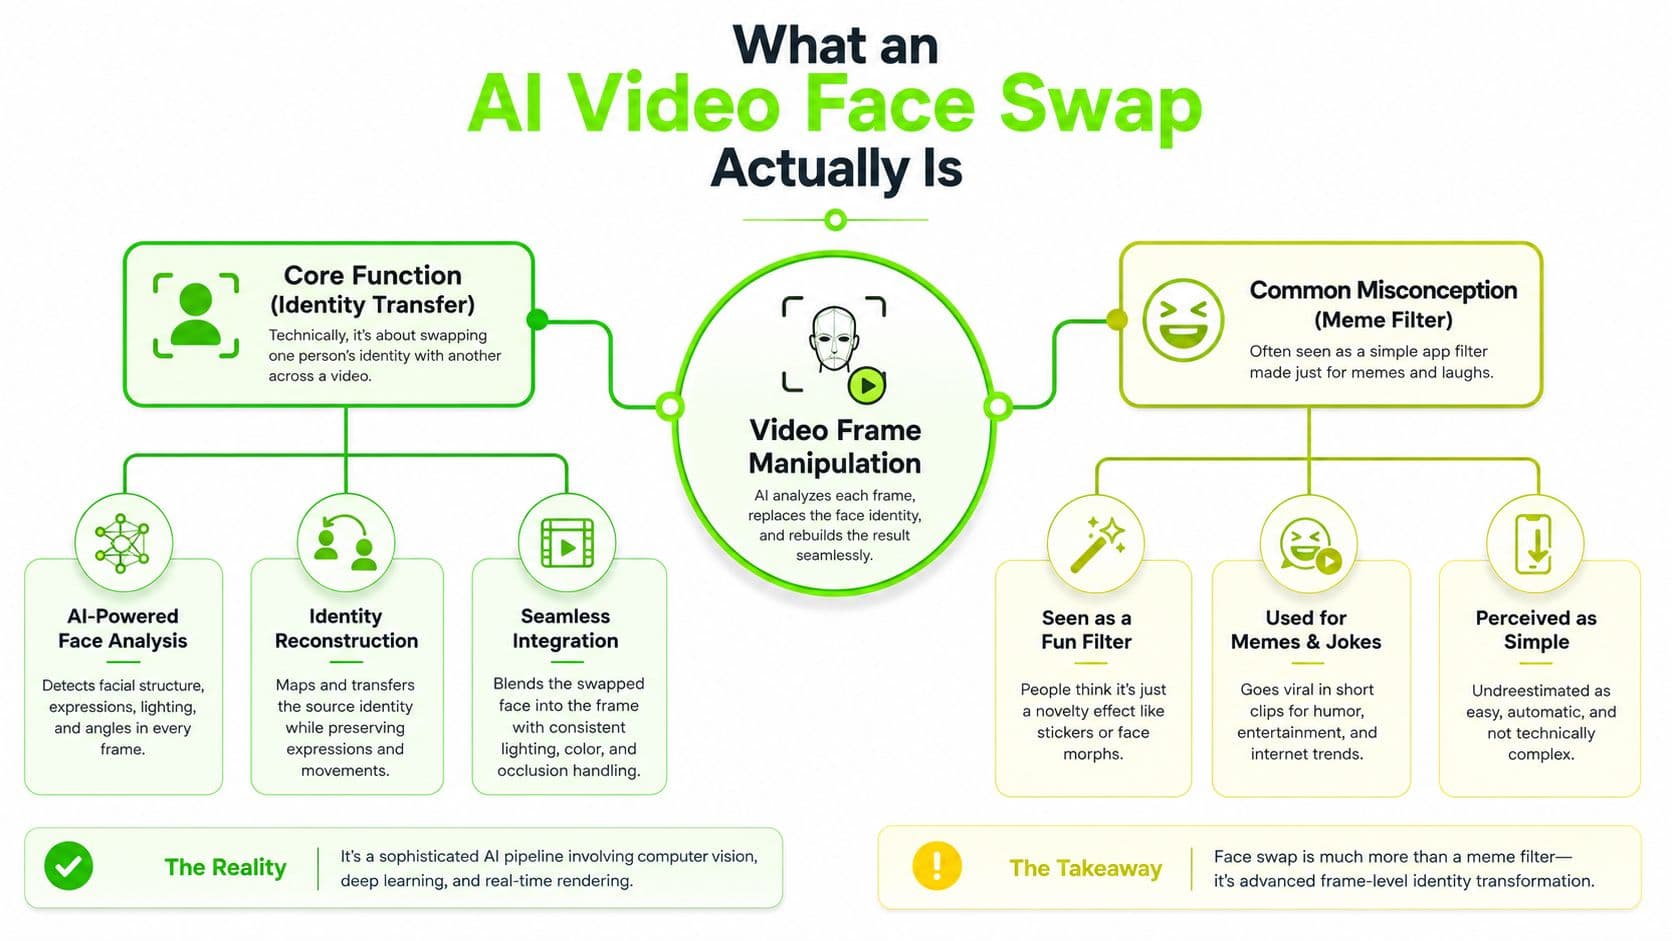
The first mistake is treating this like a meme filter. A true ai video face swap does more than paste one face onto another, it tries to preserve identity, motion, lighting, and expression across every frame in a moving sequence. A still image can look fine while the same identity falls apart in video the moment the head turns or the lighting shifts.
The shift from novelty to creator tool happened when the process became accessible enough for regular editing workflows. Research and early tools such as Face2Face showed real-time facial reenactment in video, and later open-source autoencoder workflows made pre-recorded face swaps usable for hobbyists and creators, not just specialists, while viral deepfake clips and platform bans pushed the topic into mainstream awareness (history of face swap). The creator-era jump came from deep learning, public scripts, and consumer GPUs working together.
The illusion holds only if the motion matches
What breaks a swap is usually the mismatch between the source face and the target motion, especially around blinking, jaw movement, and turning speed. The model can only sell the illusion if it keeps the face readable while still following the body beneath it.
Practical rule: if the shot would already be hard for a human editor to cut cleanly, the swap model will probably struggle too.
Creators comparing tool categories often start with broad roundups like 2026 AI content tools compared, but face swap work also needs a workflow view, not just a shopping list. A useful adjacent reference is AI video creation tools for creator workflows, because the face swap tool is only one part of the larger creator stack.
The Four-Stage Pipeline Behind the Result
A usable ai video face swap usually comes out of the same four-stage chain. The system detects and aligns the face, encodes identity, generates the replacement face, then blends and restores the result back into the frame. Each step has its own failure mode, and the weak link usually shows up before the clip ever reaches a viewer.
Detection is where bad footage gets exposed
The first stage is face detection and alignment. Tools often use RetinaFace or InsightFace to find facial landmarks, and that step matters because the model needs a stable map before it can do anything useful. If detection is sloppy, the swap starts to wander. The face can drift from frame to frame, or the model can grab the wrong angle and leave a warped jawline, mismatched eye placement, or a face that looks pasted on from the side.
Generation is fast, but blending decides whether the shot holds up
Identity encoding usually relies on ArcFace-style embeddings, while fast swappers such as SimSwap and InSwapper handle the identity transfer itself. That is the part creators notice first because it gets the face in place quickly, but the render still looks raw at that stage. The final pass, masked compositing plus restoration with tools such as CodeFormer or GFPGAN, is what softens seams, repairs edges, and calms down artifacts that would otherwise jump out on a phone screen. A common tell is a faint halo around the jaw or cheek line, and in CodeFormer the fidelity weight is the knob that usually decides how much of that rawness stays visible versus how much gets smoothed away. If the face starts to look too clean, you often trade realism for a plastic finish.
When the clip needs a better finish, resolution work matters too, because a sharp composite can still fall apart if the output is too soft or scaled badly. A practical reference is resolution scaling for video exports, since the face swap may hold in the editor and still look brittle after the final encode.
If you want a deeper edit-first comparison of tool stacks, the most useful mental model is to treat the swap as raw material, not the finished piece. That's why a browser editor such as Satura's free pro video editor fits naturally in the finishing stage, especially once you've got to trim, caption, and clean up the cut, which is the same practical logic discussed in how to edit YouTube videos.
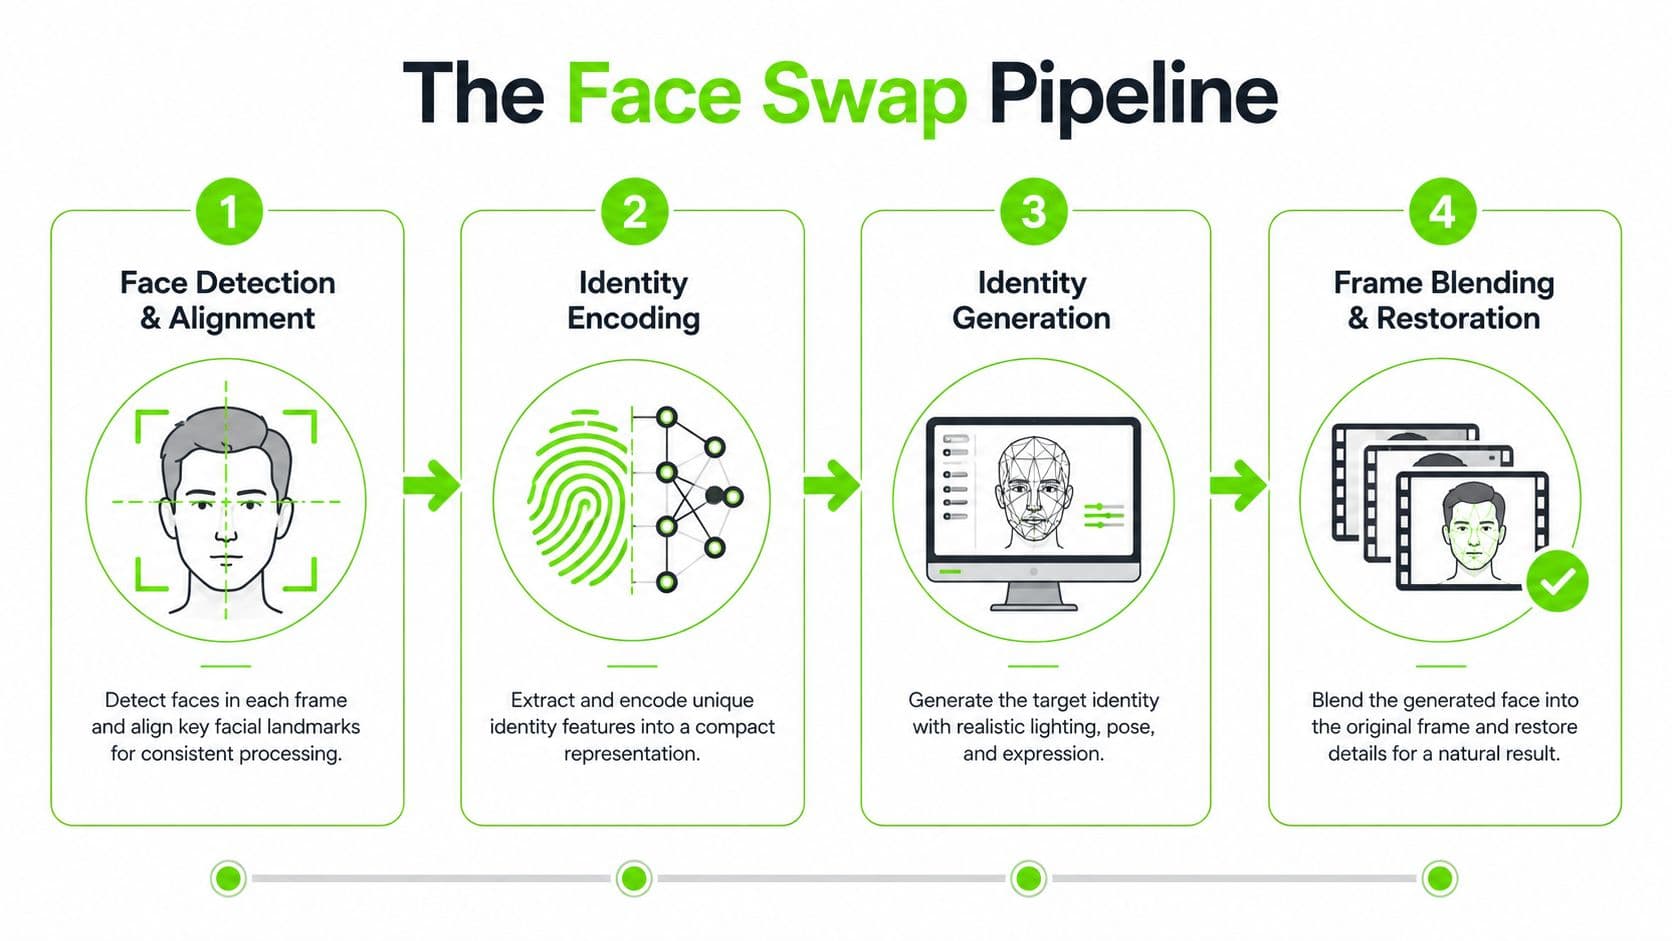
The swap doesn't fail all at once. It usually fails in layers, first at detection, then at identity transfer, then at blending, and finally at temporal consistency across the clip.
Running a Real Production Workflow
A real project starts before the model ever sees a frame. I'll usually sort the source footage by purpose first, because parody, faceless-channel dubbing, and ad creatives all punish different mistakes. A parody can survive a little obviousness. A branded clip can't. A faceless-channel workflow often cares more about clean pacing and usable lip movement than cinematic realism.
From there, the job becomes less about “generating” and more about curating inputs. The source face should be clean, the target footage should be visually stable, and the shot should be simple enough that the model doesn't have to guess what the jawline, eyes, or hairline are doing. If the scene is crowded or the framing is chaotic, I'd rather simplify the edit than force the model into a corner.
The best workflow is usually: pick the right target shot, run the swap, inspect the render, then finish the clip in an editor instead of trying to perfect everything in the generator. That final pass is where you fix the ugly edges, add timing tweaks, drop in captions, and keep the pacing tight enough for Shorts and TikTok. A browser-based editor helps here because the work is mostly about clipping, arranging, and polishing, not rebuilding the whole project from scratch.
Tool choice should follow the job, not the hype
Some tools are better when you need quick turnaround. Others are better when you're chasing fidelity on a hero shot. If you're assembling a social clip, the practical question isn't whether the tool sounds advanced, it's whether the output survives a vertical feed and a skeptical viewer. That's where a simple workflow often beats an overcomplicated one.
For direct publishing, I like to keep the face swap isolated from the rest of the edit until the very end. It keeps the troubleshooting cleaner. If the render looks wrong, I know the issue is in the source, the model choice, or the blend, not the caption timing or thumbnail comp.
Input Conditions That Actually Move Quality
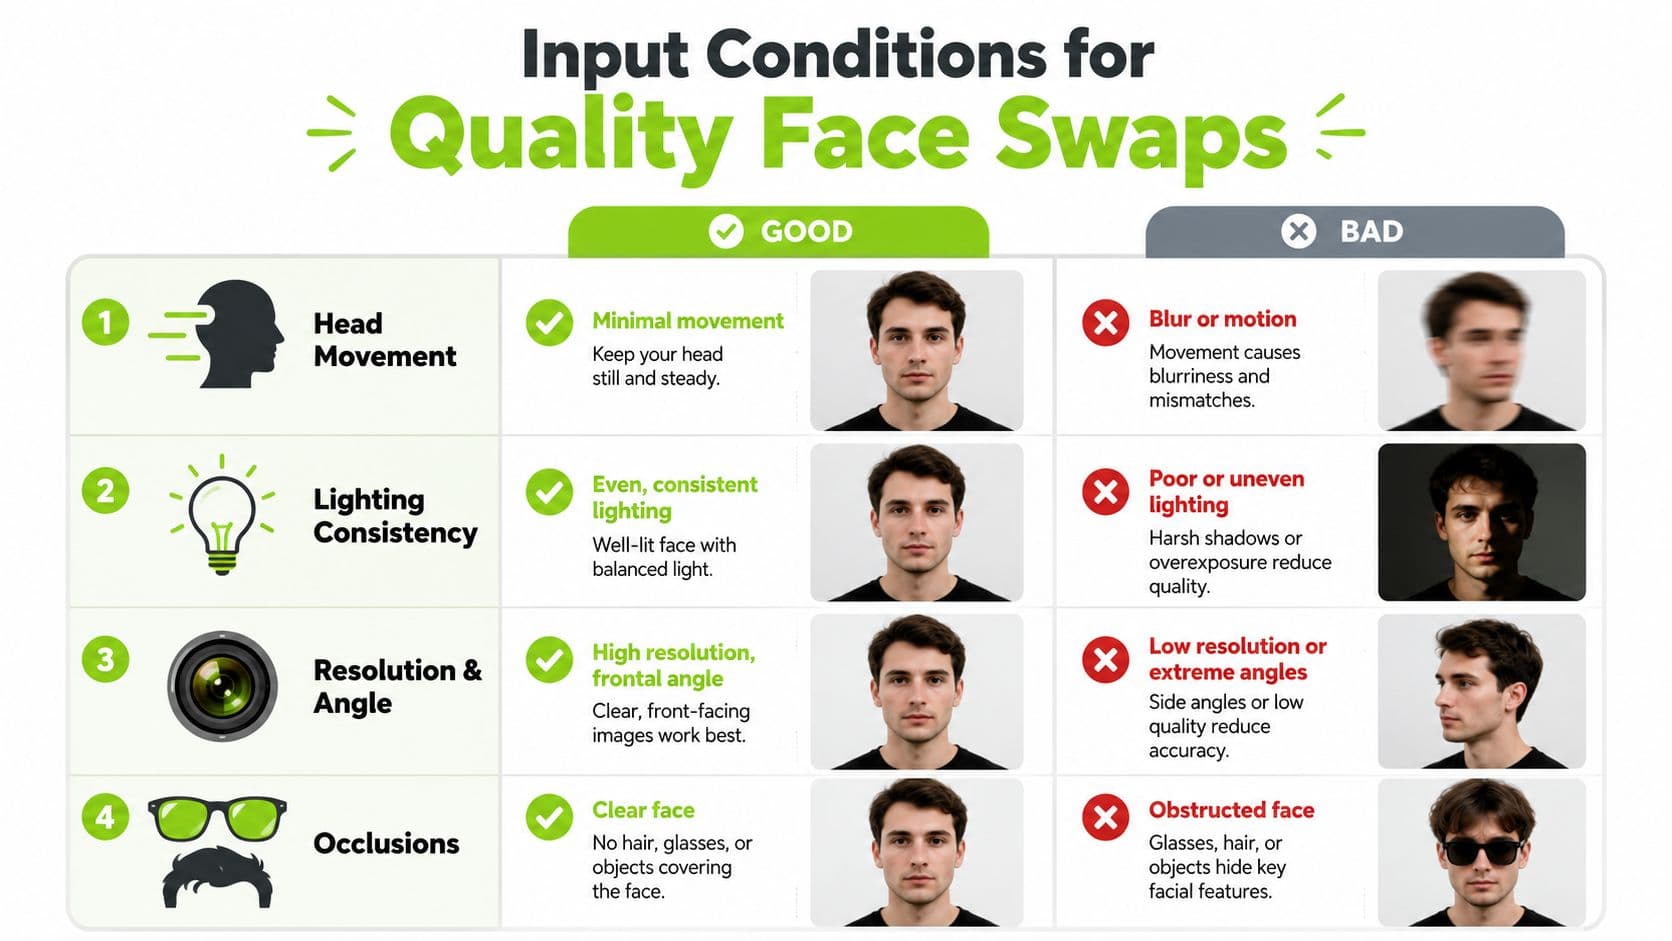
Quality starts with the footage you feed the model, not the settings you hope will save it. The clearest inputs still win: high-resolution source imagery, even lighting, a face that stays visible through most of the clip, and movement that stays close to frontal or three-quarter angles. Guidance from workflow sources also says head movement no greater than about 45 degrees from front-facing materially improves output quality (step-by-step workflow guidance).
The most useful way to think about this is as a comparison between controlled and uncontrolled input. Controlled footage, meaning frontal, well-lit, and at least 512-pixel source material with consenting subjects, tends to work well, while uncontrolled inputs may only produce acceptable results about 70% to 85% of the time depending on the model (AI face swap work conditions). That range is a practical warning, not a promise. It tells you that the footage itself is part of the model choice.
Good footage looks boring in the best way
A clean setup usually has one person clearly framed, steady lighting, and no prop-heavy interaction. In contrast, sunglasses, hats, harsh shadows, and busy backgrounds make the model work too hard. The face still needs to be the obvious subject, not one element in a visual pileup.
The ugly tells show up fast in video
The most visible failure points are jawline and neck color mismatch, hairline edges, unnatural blinking, and frame-to-frame flicker. Video is ruthless because the model has to stay consistent over time, not just across one still frame. If a shot looks fine on a paused preview but starts shimmering in motion, it's usually the temporal consistency, not the identity transfer, that's breaking down.
If the shot already includes lots of head turns, coverings, or strong shadows, it's usually faster to reshoot than to rescue it.
Consent, Disclosure, and Platform Risk
A good-looking swap is not the same thing as a safe-to-publish swap. That's the trap a lot of monetized creators fall into, especially when the clip is funny, polished, and technically clean. The publishability gate is separate from the quality gate, and it's shaped by consent, disclosure, and platform rules, not just by the model.
The reason this matters is simple. The tooling is getting faster, the workflows are getting more production-friendly, and vendors are openly positioning face swap for creator use. That doesn't erase the legal and reputational layer. If you're using someone else's likeness, or even your own likeness in a way that could confuse viewers, the content needs to be judged by how platforms and audiences will interpret it, not by how effortless it felt to make.
If you need a policy mindset for the moderation side, a useful operational reference is PartnerScanX adult content screening. The important takeaway isn't the tool itself, it's the fact that synthetic-media review is increasingly treated as a trust and safety problem, not just an editing problem. That's why this Satura AI note on inauthentic-content channel closures is relevant to any creator planning to monetize synthetic or manipulated clips.
What are the common questions?
What is the short answer for AI Video Face Swap: A Creator's Workflow Guide?
Master AI video face swap with this creator-focused workflow guide. Learn the pipeline, quality tips, ethics, and packaging for YouTube and short-form content.
What should creators do first?
Production guardrails. Keep the face visible, keep the motion reasonable, and stop trying to save shots that already look chaotic.
Who is this guide for?
This guide is for YouTube creators, faceless channel operators, agencies, and teams using AI tools to improve video production and growth.
Action checklist
Apply this to your channel today.
- 1Production guardrails. Keep the face visible, keep the motion reasonable, and stop trying to save shots that already look chaotic.
- 2Consent and disclosure gates. Check likeness rights, say what the viewer is seeing, and assume platform review is a separate hurdle.
- 3Packaging habits. Open with the idea fast, caption it clearly, and make the thumbnail match the clip.
Sources & methodology
- Satura editorial guide based on the source video, topic cluster, and article sections.
- Source video reviewed for this article: https://www.outrank.so/