
What is the quick answer?
Find the best video format for YouTube. Our 2026 guide covers MP4, H.264, bitrates, resolution, and expert export settings for maximum quality and views.
Key takeaways
- The Best YouTube Video Format Is Not What You Think
- The YouTube Format Gold Standard Explained
- What the “gold standard” actually means
- The parts that matter in practice
- A practical default to remember
- Why Your Export Settings Matter So Much
Overview
Use MP4 with H.264 video and AAC audio if you want the safest, most reliable YouTube export. If your priority is maximum image quality after YouTube re-compresses your upload, a high-bitrate master file such as ProRes 422 HQ can produce a cleaner final result than a standard H.264 export.
That second sentence is the part most guides skip.
A lot of “best video format for YouTube” advice is technically correct but incomplete. Yes, YouTube recommends MP4. Yes, H.264 is the universal default. Yes, that combo works beautifully for most creators. But “recommended” and “best possible quality” are not always the same thing, and if you've ever uploaded a video that looked great in your editor but slightly worse on YouTube, you've already felt that gap.
YouTube is a transcoding machine. You hand it a file, it rebuilds that file for streaming across phones, laptops, TVs, and shaky hotel Wi-Fi. The better your source, the better your odds of surviving that process without mushy shadows, ugly gradients, or motion that feels less clean than the original. That's why serious creators don't only ask, “What file does YouTube accept?” They ask, “What source file gives YouTube the best material to work with?”
The Best YouTube Video Format Is Not What You Think
The default answer is still the right starting point. The universally recommended video format for YouTube is MP4, specifically encoded with an H.264 video codec and AAC audio codec, because it balances strong visual quality with file sizes that are practical to upload and easy for YouTube to process, as explained in Gling's breakdown of YouTube's preferred format.
That's the part everybody repeats.
The part worth paying attention to is this: YouTube's recommendation is the best general-purpose workflow, not always the best quality-preservation workflow. If you're exporting tutorials, commentary videos, podcasts, talking-head content, and normal B-roll, MP4 with H.264 is usually the smart move. It's fast, stable, and widely supported by Premiere Pro, DaVinci Resolve, Final Cut Pro, CapCut, and browser-based editors.
But if you're uploading footage with fine gradients, dark scenes, fast motion, heavy color work, or cinematic detail, the “safe” export can leave quality on the table. YouTube will compress your file again anyway. Starting from an already compressed file means you're giving the platform less information before it starts squeezing.
Practical rule: Use MP4/H.264 for convenience, compatibility, and speed. Use a high-bitrate master when the image itself is the product.
That's why creators who care about polish obsess over more than the file extension. They care about source quality, bitrate, frame rate, and whether the export gives YouTube a clean file to chew on. If you're also adjusting footage dimensions before export, this guide on resolution scaling for online video is worth a look because resizing mistakes often start quality problems before encoding even begins.
The YouTube Format Gold Standard Explained
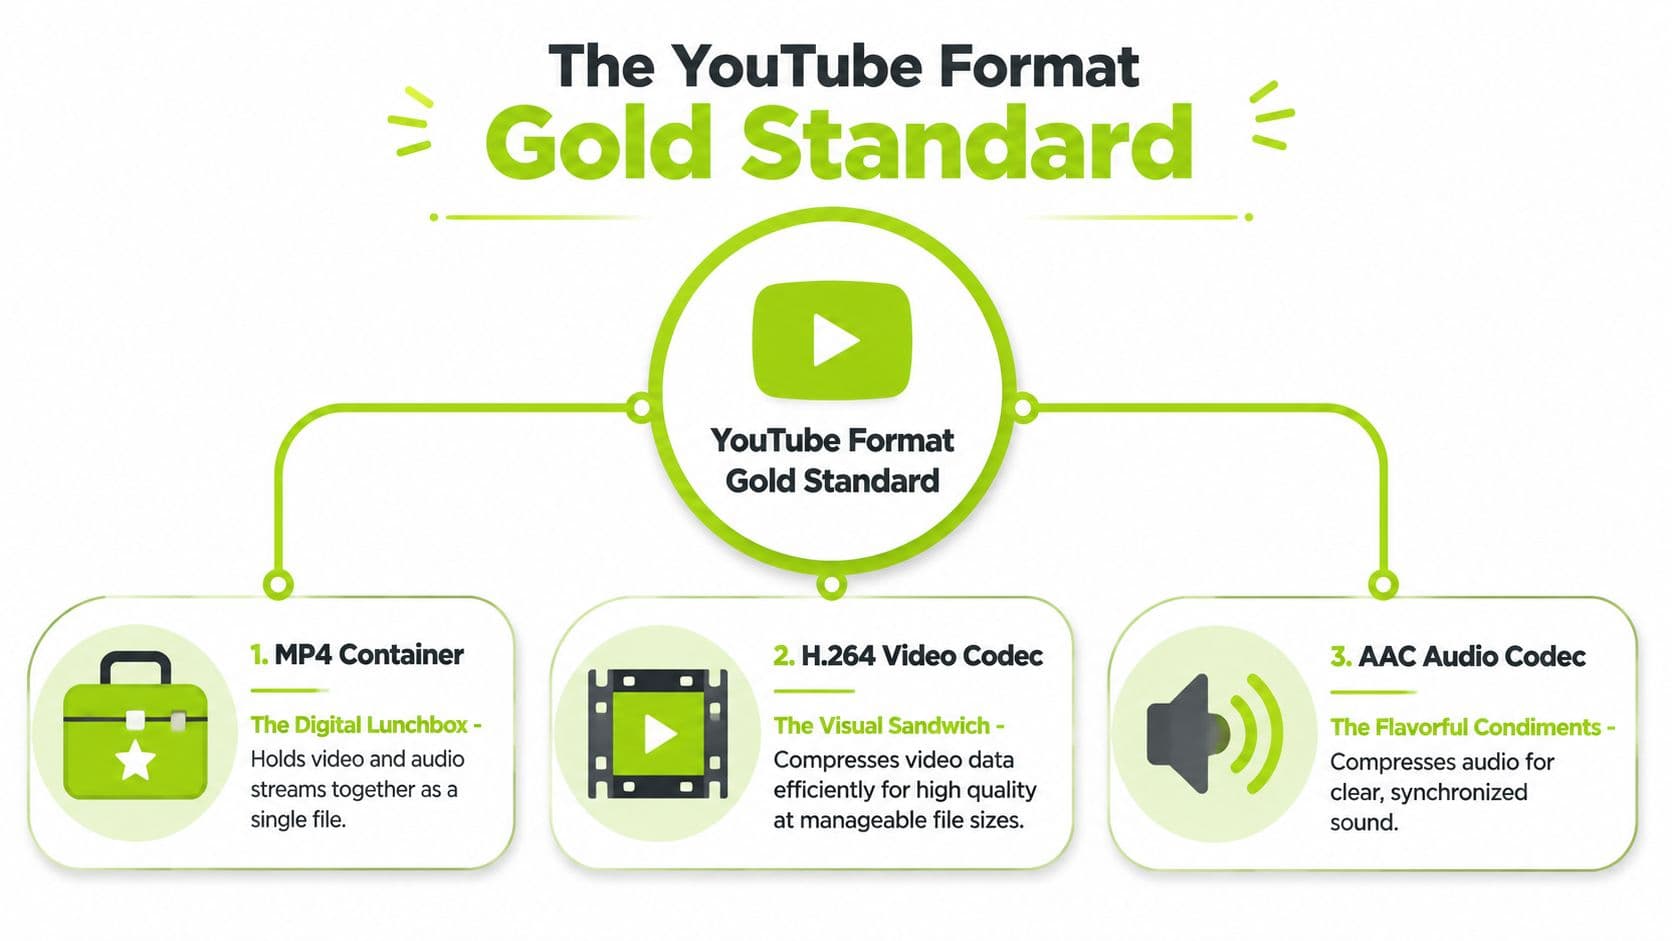
A video file is three decisions packed together: container, video codec, and audio codec. Once you separate those pieces, YouTube export settings stop looking arbitrary and start making sense.
What the “gold standard” actually means
For a standard upload workflow, the safe default is still MP4 for the container, H.264 for video, and AAC for audio.
Each part does a different job:
This is the point many creators miss. The .mp4 extension does not tell you the whole story. A file can be MP4 and still be a poor upload if the codec, bitrate, frame rate, or audio settings were exported badly.
That combination keeps winning because it is stable. It uploads cleanly, plays well across devices, and does not create unnecessary friction in editing apps, cloud storage, or review workflows. If you publish in multiple formats, Your Video Editor on video formats is a useful companion for checking how aspect ratio choices affect delivery across platforms.
- MP4 holds the video and audio streams in one file YouTube handles reliably.
- H.264 compresses the picture efficiently without creating huge exports.
- AAC keeps audio clean, widely compatible, and easy for YouTube to process.
The parts that matter in practice
Container choice is usually the easy part. Codec choice and bitrate are where quality starts to swing.
H.264 remains the default because it gives a strong quality-to-file-size balance for regular YouTube content. AAC is the standard audio match. For most spoken-word videos, tutorials, interviews, and commentary, that combo is enough.
The catch is that “standard” does not automatically mean “best looking.” If the source footage has lots of motion, fine texture, shadows, gradients, screen recordings with tiny text, or heavy color grading, the same H.264 export that works for a talking-head video can start softening details before YouTube ever touches it.
That is why experienced creators treat MP4/H.264 as the best delivery default, not the best master format.
A practical default to remember
| Part | Best default choice | Why creators use it |
|---|---|---|
| Container | MP4 | Reliable uploads and broad compatibility |
| Video codec | H.264 | Good image quality without oversized files |
| Audio codec | AAC | Clean playback and wide device support |
| Standard frame shape | 16:9 | Native fit for regular YouTube videos |
For regular long-form uploads, 16:9 remains the standard shape, with 1080p as the baseline most creators should hit if the source supports it. 4K can still be worth exporting, even for viewers watching on smaller screens, because YouTube often gives higher-resolution uploads better processing and cleaner final encodes.
If you want to sanity-check bitrate before exporting, use a YouTube bitrate calculator for HD and 4K uploads. It saves time when you are bouncing between frame rates and resolutions.
The short version is simple. Use MP4, H.264, AAC, and a clean 16:9 export for the majority of YouTube videos. Switch to a high-bitrate master when the image quality itself is the priority, because that is where the usual “recommended settings” stop being the ultimate standard.
Why Your Export Settings Matter So Much
A lot of upload problems don't start on YouTube. They start in the export window.
What YouTube does after you upload
YouTube doesn't merely host your file as-is. It ingests it, analyzes it, and re-encodes it into versions that can stream under different network conditions and on different devices. That process is why a perfect-looking timeline export can come back looking slightly softer, noisier, or more banded after upload.
One specific detail from YouTube's official encoding guidance matters more than most creators realize. The preferred configuration places the “moov atom at the front of the file” for Fast Start, which helps playback begin before the whole file finishes downloading, as noted in YouTube's recommended upload encoding settings. That sounds obscure, but the viewer-facing effect is simple. Faster starts, less waiting, less friction.
A YouTube upload isn't the final delivery file. It's the source file for YouTube's own video factory.
That's why clean inputs matter. When you upload something close to YouTube's preferred structure, the platform has less work to do before it can make watchable streaming versions.
Where bad exports fall apart
The ugly part is double compression. If you export with a heavily compressed source, then YouTube compresses that file again, the damage stacks. You'll notice it first in the places compression always struggles:
A non-preferred source can also trigger more visible quality loss during YouTube's server-side re-encoding. Sources that already threw away too much information leave less room for YouTube to build decent playback versions.
There's another practical issue. Frame rate mismatches create messes that are easy to blame on YouTube but usually trace back to export settings. YouTube's accepted and recommended frame rates include 24, 25, 30, 48, 50, and 60 fps, and you should keep the upload at the footage's native frame rate, according to Pinnacle's guide to YouTube upload format settings. If you shot at one frame rate and export at another for no good reason, motion can look off even before YouTube finishes processing.
Here's the no-nonsense version:
- Dark scenes where shadows turn blocky
- Gradients like skies or studio backdrops that start banding
- Fast motion where detail smears
- Screen recordings where text loses crispness
- Start with a clean master. Don't crush the file harder than necessary.
- Match native frame rate. Don't invent frames or resample casually.
- Use a codec YouTube likes. Or go one step higher with a mastering format when quality matters most.
- Treat export as prep, not paperwork. The file you upload determines what YouTube can preserve.
Your Ultimate YouTube Export Settings Cheat Sheet
You do not need exotic export settings to get a strong result on YouTube. You need a clean, predictable file that gives YouTube less room to wreck fine detail during its own encode.
For standard uploads, the safe default is still MP4, H.264 video, and AAC or AAC-LC audio. Keep the frame rate matched to your source footage. For bitrate, treat YouTube's published recommendations as a floor, not always the finish line. A straightforward talking-head video can hold up well at lower H.264 bitrates. Dense motion, dark footage, gradients, screen recordings, and heavy grading usually benefit from more headroom before upload.
Here's the cheat sheet I'd use.
| Scenario | Container | Video codec | Audio codec | Aspect ratio | Frame rate | Recommended bitrate |
|---|---|---|---|---|---|---|
| 1080p SDR standard video | MP4 | H.264 | AAC | 16:9 | Match source | 8 to 12 Mbps |
| 4K SDR standard video | MP4 | H.264 | AAC | 16:9 | Match source | 35 to 45 Mbps |
| 1080p HD upload with motion, grading, or screen detail | MP4 | H.264 | AAC-LC | 16:9 | Match source | 15 to 20 Mbps |
| 4K higher-quality upload | MP4 | H.264 | AAC-LC | 16:9 | Match source | 35 to 60 Mbps |
| 1080p HDR upload | MP4 | H.264 or HEVC if your editor supports a clean HDR workflow | AAC | 16:9 | Match source | Start higher than a basic SDR export |
The split between lower and higher 1080p bitrates is intentional. Both can be correct. If the video is simple and you want smaller exports and faster uploads, use the lower range. If the footage has fine texture, fast cuts, low light, or graphics that need to stay crisp, use the higher range.
That trade-off matters more than creators expect.
A lot of guides present YouTube's recommended settings as the best settings. They are not always the best for image quality. They are the safest broad-compatibility settings. If quality is the priority, give YouTube a better source file, even if that means a heavier upload. If you are also cleaning or enlarging footage before export, this guide on upscaling video with Topaz Starlight Precise 2.5 is a useful prep step before you render your upload master.
If you're still choosing software, this roundup of compare YouTube video editing tools is helpful because some editors hide bitrate controls behind presets, while others let you set exact targets and audio options.
Quick notes for Shorts and vertical uploads
Shorts need a different export shape and a different editing mindset. Use 9:16, not 16:9, and build the frame for vertical viewing from the start.
Use this checklist for vertical exports:
Good YouTube exports are usually boring. Correct aspect ratio, native frame rate, and enough bitrate to survive re-encoding beat fancy codec talk on most uploads.
- Edit in a vertical timeline. Reframing at the last minute usually creates awkward crops.
- Match the source frame rate. Keep motion natural instead of forcing conversions.
- Protect text clarity. Captions, UI callouts, and product details fall apart fast if bitrate is too low.
- Leave room for the app interface. Keep key text and faces away from the extreme edges.
Beyond H264 When Quality Is Everything
YouTube's recommended export settings are built for reliability. They are not the ceiling for image quality.
What are the common questions?
What is the short answer for Best Video Format for YouTube: The 2026 Upload Guide?
Find the best video format for YouTube. Our 2026 guide covers MP4, H.264, bitrates, resolution, and expert export settings for maximum quality and views.
What should creators do first?
Export the right version for the job. If this is a regular weekly upload, H.264 in an MP4 container is usually the practical choice. If quality is the priority and upload time is not, keep your high-bitrate master, including ProRes, as your archive and export a delivery copy for upload.
Who is this guide for?
This guide is for YouTube creators, faceless channel operators, agencies, and teams using AI tools to improve video production and growth.
Action checklist
Apply this to your channel today.
- 1Export the right version for the job. If this is a regular weekly upload, H.264 in an MP4 container is usually the practical choice. If quality is the priority and upload time is not, keep your high-bitrate master, including ProRes, as your archive and export a delivery copy for upload.
- 2Match the sequence to the final aspect ratio
- 3Reframe manually instead of scaling to fit
- 4Preview the full frame on both desktop and mobile
- 5Export separate versions for long-form and Shorts if the shot needs different crops